How to Convert 3MF to STL (and STL to 3MF) for Free
You don't need a converter website or a paid app. A free slicer turns a 3MF into an STL, or an STL into a 3MF, in about a minute. Here are the exact menu steps, and what quietly gets left behind.
Someone sends you a 3MF file, or you download one, and the tool you want to use only takes STL. Or it's the other way round: you have an old STL and want the tidy, all-in-one 3MF that newer slicers save. Either way, the job takes about a minute and costs nothing. You don't need a converter website or a paid app. A free slicer does it.
This guide shows how, step by step, in Bambu Studio, OrcaSlicer and PrusaSlicer. It also covers the part most guides skip: what you lose when a 3MF becomes an STL, and why a colorful model can turn into one grey lump. If you're shopping first, every design on our models page already comes with both formats, so you may be able to skip the conversion entirely.
If the file types themselves are new to you, What is a 3MF file? explains what's packed inside one, and STL vs 3MF covers which one to print.
Do you even need to convert a 3MF to STL?
Often you don't. Check three things first.
- Your slicer may already open 3MF. The slicer is the free program that turns a model into instructions for the printer. Bambu Studio, OrcaSlicer, PrusaSlicer and Cura all open 3MF files directly.
- The download may already include STLs. Many designers ship both. Every 3MF Labs download has a 3MF project and an STL of every part, in two folders side by side.
- You may want the 3MF anyway. A 3MF can hold the plate layout, the colors and the print settings. An STL holds only the shape. Converting throws the extras away, so do it only when something actually needs an STL.
Good reasons to convert: a design or sculpting app that only imports STL, a print service or library that asks for STL, an older slicer that doesn't read 3MF well, or a friend whose setup needs it (for your own files, not ones you bought under a license that says not to share them).
How do I convert a 3MF to STL in Bambu Studio?
Bambu Studio is free for Windows, Mac and Linux, and it works even if you don't own a Bambu printer. The steps:
- Open the 3MF. Use File, then Open Project, or drag the file onto the window. If it asks, choose to open it as a project.
- Go to File, then Export. You'll see two STL options.
- Pick one. "Export all objects as one STL" saves everything on the plate into a single file. "Export all objects as STLs" saves each object as its own file.
- Choose a folder and save. That's it. The STL is ready for any program that takes one.
Want just one piece from a busy plate? Click it in the 3D view (hold Ctrl to pick several), right-click, and choose "Export as one STL" or "Export as STLs". Only the selected objects are saved.
Those menu names are taken from Bambu Studio's own published source code, so they match the current version. If yours looks slightly different, it's an older version; the options sit in the same File, Export menu.
How do I convert 3MF to STL in OrcaSlicer or PrusaSlicer?
OrcaSlicer grew out of Bambu Studio, and the export menu is the same: File, then Export, then "Export all objects as one STL" or "Export all objects as STLs". Right-clicking a selected object gives the same per-object options.
PrusaSlicer words it a little differently. Open the 3MF with File, then Import (or drag it in), then use File, Export, "Export Plate as STL/OBJ" to save everything on the bed as one file. For a single object, right-click it in the 3D view and choose "Export as STL". Prusa's help pages describe both.
Whichever slicer you use, do a quick sanity check afterwards: re-open the new STL in the slicer and make sure every part is there and the size looks right. It takes ten seconds and saves a wasted print.
What do you lose when you convert 3MF to STL?
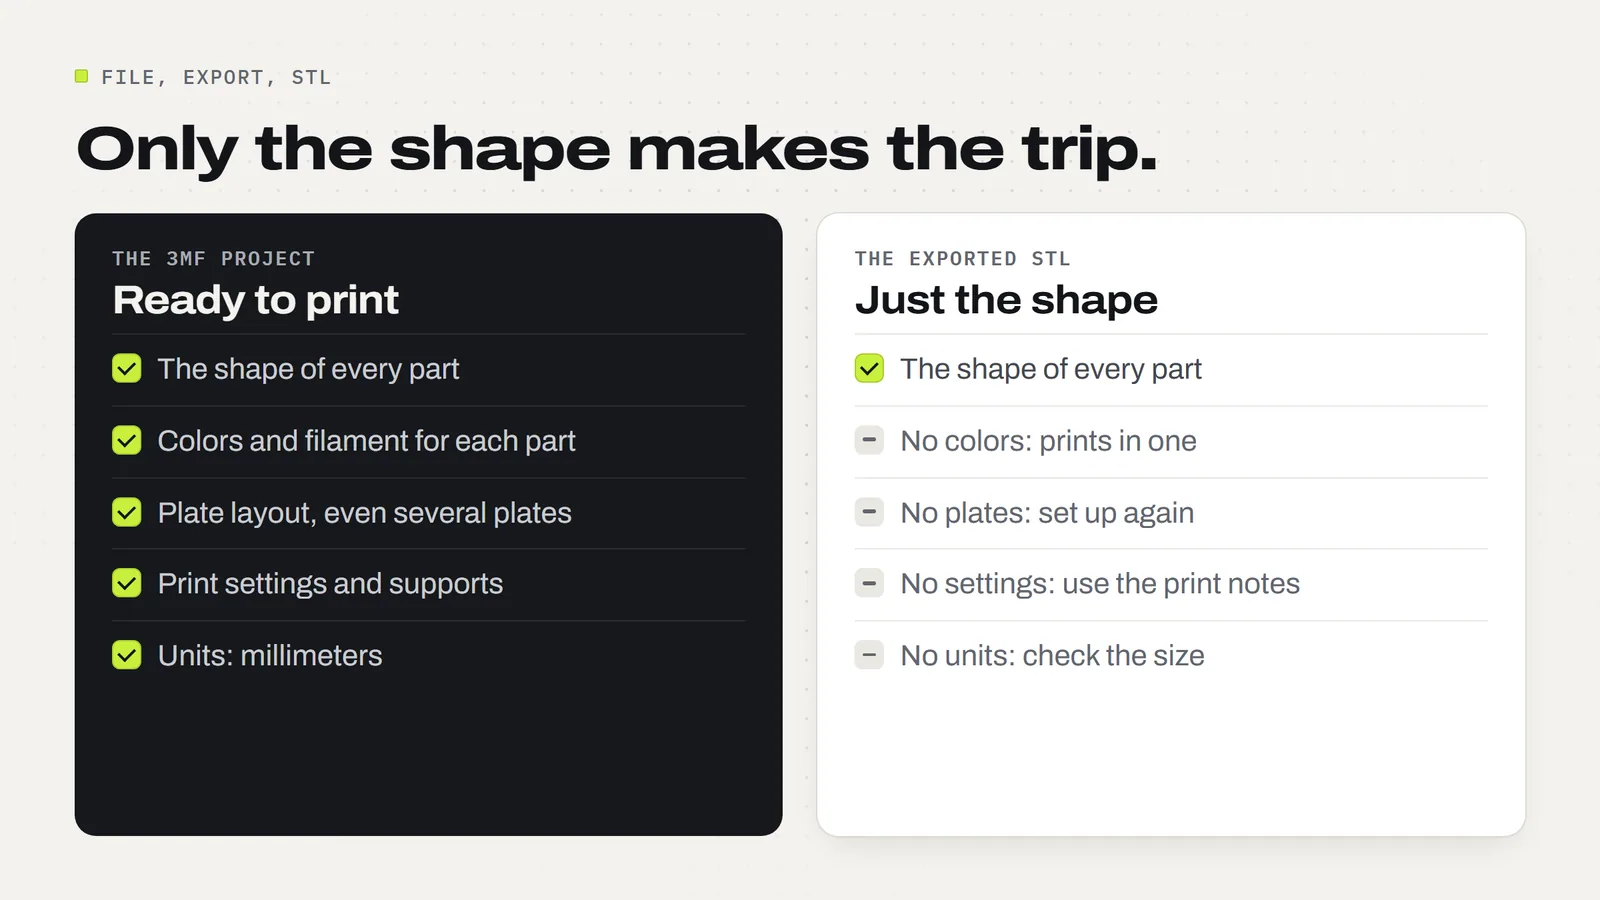
An STL is a list of tiny triangles describing a surface. It has no room for anything else. Here's what makes the trip and what doesn't:
| What the file holds | In the 3MF | In the exported STL |
|---|---|---|
| The shape of each part | Yes | Yes |
| Colors and which filament goes where | Yes | No |
| Where parts sit on the plate | Yes | Partly (one combined STL keeps their spacing; separate STLs don't) |
| Several plates in one project | Yes | No |
| Print settings (layer height, walls, infill, supports) | Yes | No |
| Units (millimeters) | Yes, stated in the file | No, the program has to assume |
| A preview picture | Often | No |
The settings loss matters more than people expect. If the designer saved special settings that make a part work, like a bigger gap on a hinge or supports only under one overhang, those are gone. You'll need to set them again by hand, and the designer's print notes are the place to find them. Our downloads put those in a plain-English START_HERE guide for exactly this reason.
The units line causes the classic mistake: an STL that imports at a tiny or giant size. STL files carry no unit, so a program can guess inches when the designer worked in millimeters. If something arrives about 25 times too small or too big, that's why. Re-import and pick millimeters, or scale by 2540% or 3.937% to undo the mix-up.
Why did my multicolor 3MF turn into a one-color STL?
Because an STL can't hold color, and a multicolor model is usually one shape with colors assigned to it, or several shapes stacked into one object. When it's exported as a single STL, everything fuses into one grey solid. Print it and you get a perfectly good model in one color, which may be exactly what you want. If it isn't, you need one STL per color, all lined up so they fit back together.
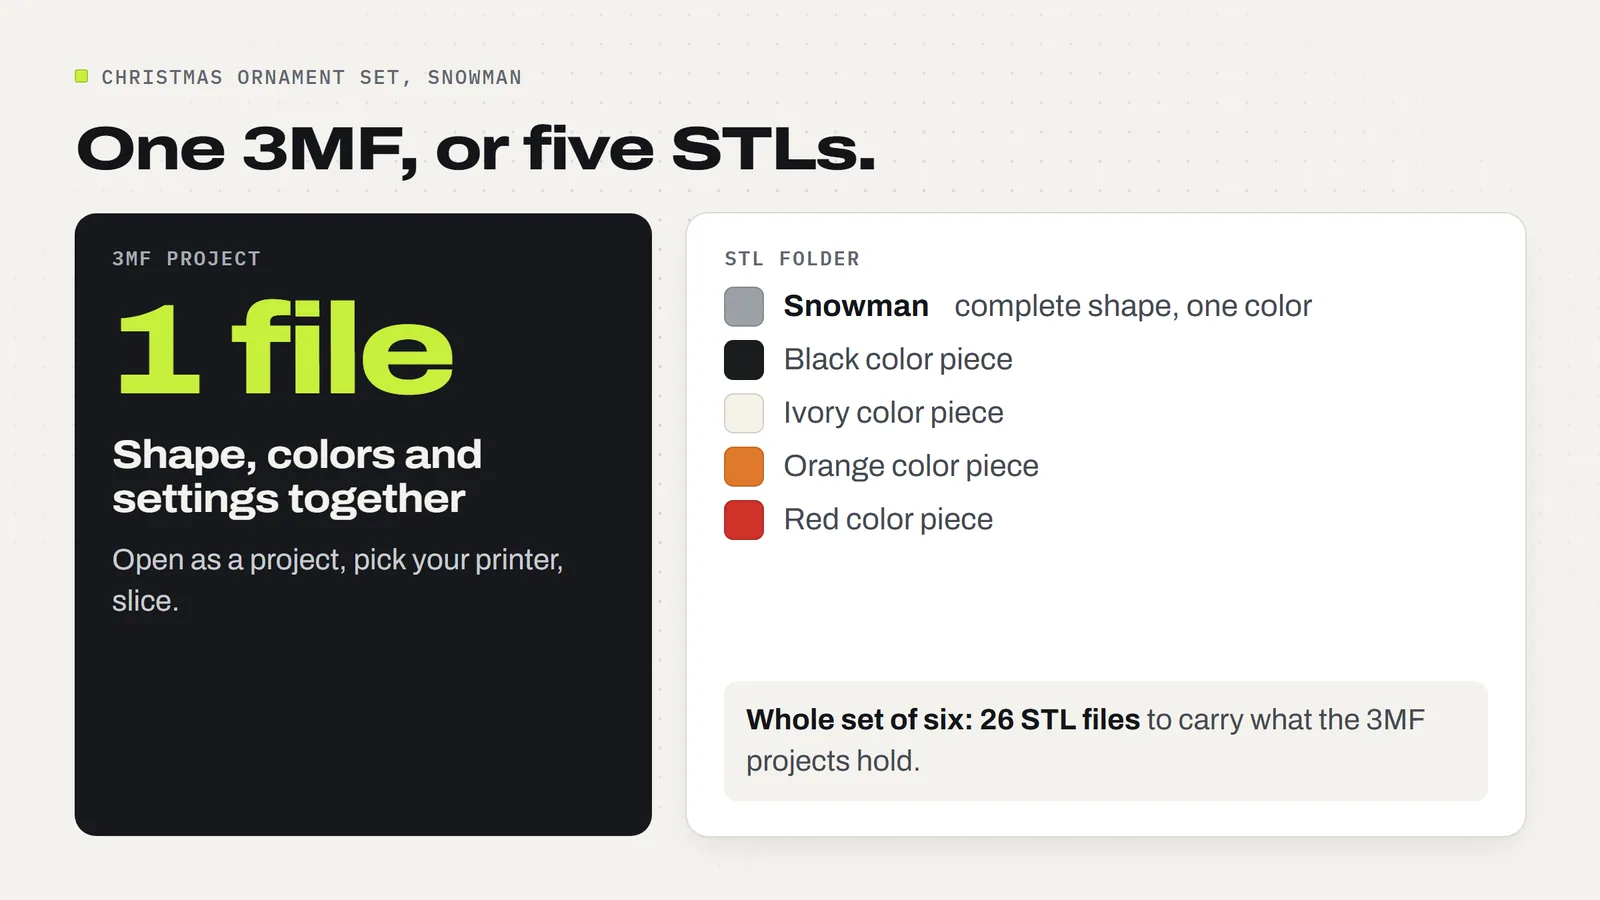
Our Christmas Ornament Set shows what that looks like in practice. It has six ornaments, and the 3MF projects keep each one's colors. The STL folder holds 26 files to carry the same information:
- six complete ornaments, each as one fused, single-color STL;
- one plate of all six together, also single color;
- 19 color pieces: two for the snowflake, three each for the candy cane, gingerbread man and name banner, and four each for the snowman and the tree.
To rebuild a full-color ornament from STLs, you import all the color pieces for that one ornament together, keep them in place, and tell the slicer which filament each piece uses. It works, but it's fiddly, and it's the exact job the 3MF project had already done for you. That's the real cost of converting: one 3MF file did what 26 STLs need instructions to do.
Not every model needs this. Plenty of designs print in one color, and some get their color from a simple pause and filament swap between layers. Do you need an AMS? explains how to tell which kind you have.
Should I export one STL or separate STLs?
Use one STL when the parts belong together in their exact positions, like a set of pieces laid out to print on one plate, or color pieces that have to stay lined up. Use separate STLs when you want to print the parts on their own, scale one of them, or send someone a single piece.
One warning about combined files: if two parts touch or overlap, one STL can merge them into a single solid. That's fine for a shape you'll print as is, but you can't pull them apart again later. When in doubt, export separate files; you can always load several STLs together.
How do I convert an STL to 3MF?
This direction is even easier, and it's worth doing for any model you print often.
- Import the STL into Bambu Studio, OrcaSlicer or PrusaSlicer (File, then Import, or drag it in). If it comes in at the wrong size, fix the units now.
- Set it up the way you like it: printer, filament, layer height, supports, where it sits on the plate. Add colors if you want them.
- Save it as a project with File, then Save Project As. The file you get is a 3MF.
Next time you open that 3MF, everything is exactly where you left it. For anything you print in batches, like stock for a craft fair, that's the whole point. You set up the plate once, and every reprint is open-and-go.
One extra option in Bambu Studio: File, Export, "Export Generic 3MF". Bambu's own project files use some extra features that not every program understands. The generic version leaves those out, which helps if a 3MF from Bambu Studio won't open cleanly somewhere else.
What about online 3MF to STL converters?
They work, and for a quick one-off they're fine. Upload the 3MF, download the STL. They do the same thing a slicer's export does, so you lose the same things: colors, plates and settings.
Two things to weigh. First, you're uploading the file to someone else's server, which is worth thinking twice about for anything you paid for or made yourself. Second, a slicer gives you more control: you can see the model, pick which parts to export, and check the result before you save. Since a free slicer does the job in under a minute, it's the better habit.
What's in every 3MF Labs download?
Every design on 3mflabs.com/models downloads with:
- A 3MF project set up in Bambu Studio, with the plate, colors and settings already saved. Open it as a project, pick your printer and slice.
- STL files of every part for any other slicer, so you never need to convert.
- A START_HERE guide with the print notes in plain English.
- A license that lets you sell the physical prints you make, with no limit and no royalty. The files themselves stay yours to print, not to share. The full terms are on the license page.
Designs whose colors share a layer, like the Peppermint Snake, need an AMS or similar system for full color, and print in one color from the STL on anything. Flat, layered designs like the Christmas Ornament Set include the color pieces described above. Questions not covered here are probably answered in the FAQ.
Designs from this guide
 $3.79
3ML-021 · Ornament set
Christmas Ornament Set
Six flat layered tree ornaments with bold black outlines: a snowflake, a snowman, a candy cane, a gingerbread man, a Christmas tree and a blank name banner you personalize. STL + 3MF · 8.7 MB View model $3.79
3ML-013 · Flexi snake
Peppermint Snake
A wiggly snake made of peppermint candies, with black eyes and a red tongue. It prints in one piece, already joined, so there's nothing to put together. STL + 3MF · 23 MB View modelQuestions
How do I convert a 3MF file to STL for free?
Open the 3MF in a free slicer. In Bambu Studio or OrcaSlicer choose File, Export, then Export all objects as one STL (or as STLs for separate files). In PrusaSlicer choose File, Export, Export Plate as STL/OBJ. Save, and the STL is ready.
Can Bambu Studio export STL?
Yes. File, Export has two options: Export all objects as one STL and Export all objects as STLs. You can also select objects, right-click and choose Export as one STL or Export as STLs to save only those pieces.
Does converting 3MF to STL lose quality?
The shape comes through unchanged. What you lose is everything else: colors, the plate layout, multiple plates, print settings, the preview picture and the units. Set those again in your slicer, using the designer's print notes.
Why is my STL one color when the 3MF was multicolor?
An STL can't store color. A single exported STL fuses every colored part into one solid. To keep colors you need one STL per color, lined up, and you assign filaments to them in the slicer. Many designers include those color pieces in the download.
How do I convert an STL to 3MF?
Import the STL into Bambu Studio, OrcaSlicer or PrusaSlicer, set up the printer, filament, settings and colors, then use File, Save Project As. The saved project is a 3MF that reopens exactly as you left it.
Why is my converted STL the wrong size?
STL files carry no units, so a program may read millimeters as inches. If the model is about 25 times too big or small, re-import and choose millimeters, or scale it by 3.937% or 2540% to undo the mix-up.
Can Cura open 3MF files, or do I need an STL?
Cura opens 3MF files directly, so you usually don't need to convert. It reads the shapes; settings saved by another slicer may not carry over, so check them before slicing.
Are online 3MF to STL converters safe?
They work and lose the same things a slicer export does. The catch is that you upload the file to someone else's server. For files you paid for or made yourself, a free slicer does the same job on your own computer in under a minute.
Sources
Filed under Files and formats