Stringing on Your Prints? Dry Your Filament (and 3 Other Fixes)
Thin hairs of plastic between your prints usually start with the spool, not the slicer. Here is how to check for wet filament, Bambu Lab's drying numbers for PLA and PETG, and three setting changes to try next.
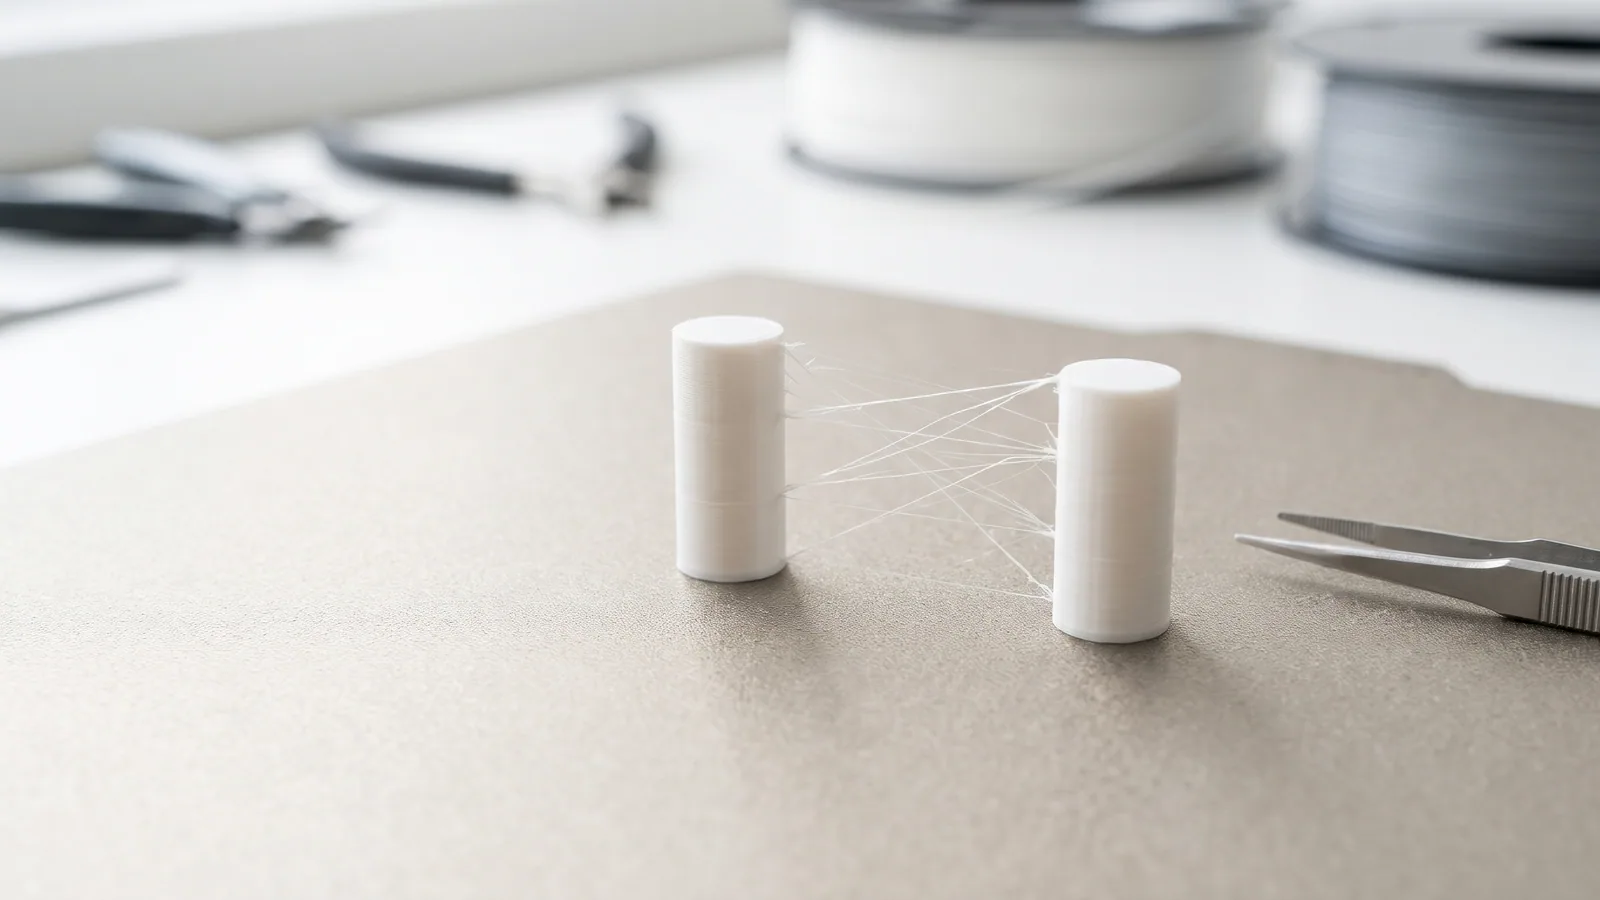
You lift a batch of ornaments off the plate and they are joined by fine hairs of plastic, like a spider moved in overnight. That is stringing. It is one of the most common print problems, it rarely ruins a print, and it costs real time when you are cleaning 30 pieces for a craft fair table.
The usual advice jumps straight to slicer settings. Start with the spool instead. If the filament has been sitting out in a damp room, no setting will fully fix the problem, and you can lose an evening trying. This guide covers the check, the drying numbers from Bambu Lab's own table, and three setting changes to try after that, in plain English. If you use one of our ready-to-print designs, it also shows what is already saved in the file so you know where you are starting from.
What causes stringing in 3D printing?
Between one part of a print and the next, the print head lifts and moves across empty air. The nozzle is still full of hot, runny plastic. If some of it leaks out during that trip, it stretches into a thin thread and stays behind. Do that hundreds of times and you get a cobweb.
Four things make the leak worse:
- Wet filament. Filament soaks up water from the air. Bambu Lab's wiki explains that the moisture turns to vapor in the hot nozzle, the melted plastic expands and comes out unevenly, and the result is stringing, oozing, holes and rough surfaces.
- A nozzle that is too hot. Hotter plastic is runnier, so it leaks more easily.
- Too little retraction. Retraction means the printer pulls the filament back a little before a trip, which lowers the pressure in the nozzle.
- Long or frequent trips. A plate of small, separate parts, like earrings, gives the nozzle far more trips across open air than one big solid shape does.
A few wisps are normal, and our own guides expect them. Of our 106 live designs, 41 list a step for clearing strings during cleanup. The goal is a quick pass with your fingers, not a perfect plate.
How can you tell if your filament is wet?
You can check in about two minutes, before you touch a setting. Watch and listen while the printer lays down a steady line:
- Popping or crackling from the nozzle. That is water turning to steam. A Bambu forum tip suggests heating the nozzle, pushing out a few millimeters of filament by hand from the printer's screen and listening.
- Tiny bubbles, holes or a rough surface on the print, often along with weaker layers.
- A spool that has been out for a while, especially in a garage or a humid room.
That last one catches more people than you might think. Bambu's wiki says that in a typical room at around 55% humidity, freshly dried filament usually takes on enough moisture to affect print quality within 2 to 12 hours, depending on the material. So "I dried it last month" doesn't count if it has been sitting out since.
If you hear no popping and the surface looks clean, the spool may be fine, and you can move on to the settings below. Drying ties up a spool for 8 to 12 hours, so do this check first when you are short on time.
How do you dry filament?
There are three common ways, and which you can use depends on your equipment. These are Bambu Lab's published settings for its PLA Basic, PLA Matte and PETG filaments.
| Method | PLA Basic / Matte | PETG |
|---|---|---|
| Forced-air oven or dryer | 50 °C, 8 hours | 60-65 °C, 8 hours |
| AMS 2 Pro or AMS HT | 45 °C, 12 hours | 65 °C, 12 hours |
| Printer's heated bed, spool covered (enclosed printers only) | 60-70 °C, 12 hours | 75-85 °C, 12 hours |
The bed number looks high because the bed heats the spool from below, through the air under a cover. Don't use it as an oven setting. Bambu's PLA data sheet gives a slightly different figure from the wiki (55 °C for 8 hours), so treat 50 to 55 °C as the range and stay on the low side if you aren't sure of your dryer's accuracy.
Filament dryer. This is the simplest option for most people. Set the temperature, leave the spool in it, and print when it is done. Bambu's numbers are written for a forced-air oven, so follow your dryer maker's instructions if they differ.
AMS 2 Pro or AMS HT. These units have drying built in. Load the spool, pick the filament type and start. Bambu warns that the static mode isn't suitable for PLA, because the coils can stick together, so use the mode that rotates the spool. You can read more about these units in do you need an AMS.
The printer's bed. This works only on enclosed printers. Bambu's wiki says the P1P, A1, A1 mini and A2L are open-frame printers and can't be used to dry filament this way. On the H series, X series, X2D and P2S there is a drying routine. On the P1S you set the bed temperature and keep track of the time yourself. Either way, unload the filament from the print head first, cover the spool with its cardboard box or a heat-resistant printed cover, and flip it midway. Wear gloves for the flip. Third-party spools may not take the heat, so check yours first.
Don't use a kitchen oven or a microwave. Bambu's wiki says microwave heat can't be controlled, and kitchen ovens heat so unevenly that areas near the elements can damage the spool or the filament.
Does PLA need to be dried?
Not always, but it can be worth it. Bambu's table lists drying before use as "recommended" for PLA Basic, and a spool that has been sitting out is the first thing to suspect when PLA strings. When looks matter, Bambu suggests drying before printing if you aren't sure how a spool was stored.
A couple of our designs call this out. The Christmas Tree Marble Run and the Spice Rack both ask for dry PLA on the short bridges those parts print across open air.
Why does PETG string so much?
PETG prints hotter than PLA and stays soft longer after it leaves the nozzle, so it tends to pull thin threads as the head moves away. Our PLA vs PETG guide compares the two materials. In short, expect a few strings from PETG even when everything is right.
Two things follow from that. Dry a PETG spool before you start changing settings, because damp PETG strings badly. And don't chase zero strings by raising retraction again and again. Sovol's PETG guide warns that this can cause clogs, grinding and small bumps without removing the hairs. Our Christmas Light Clips are set up for PETG because they live outside, so a little cleanup comes with the job.
What should you change after drying the filament?
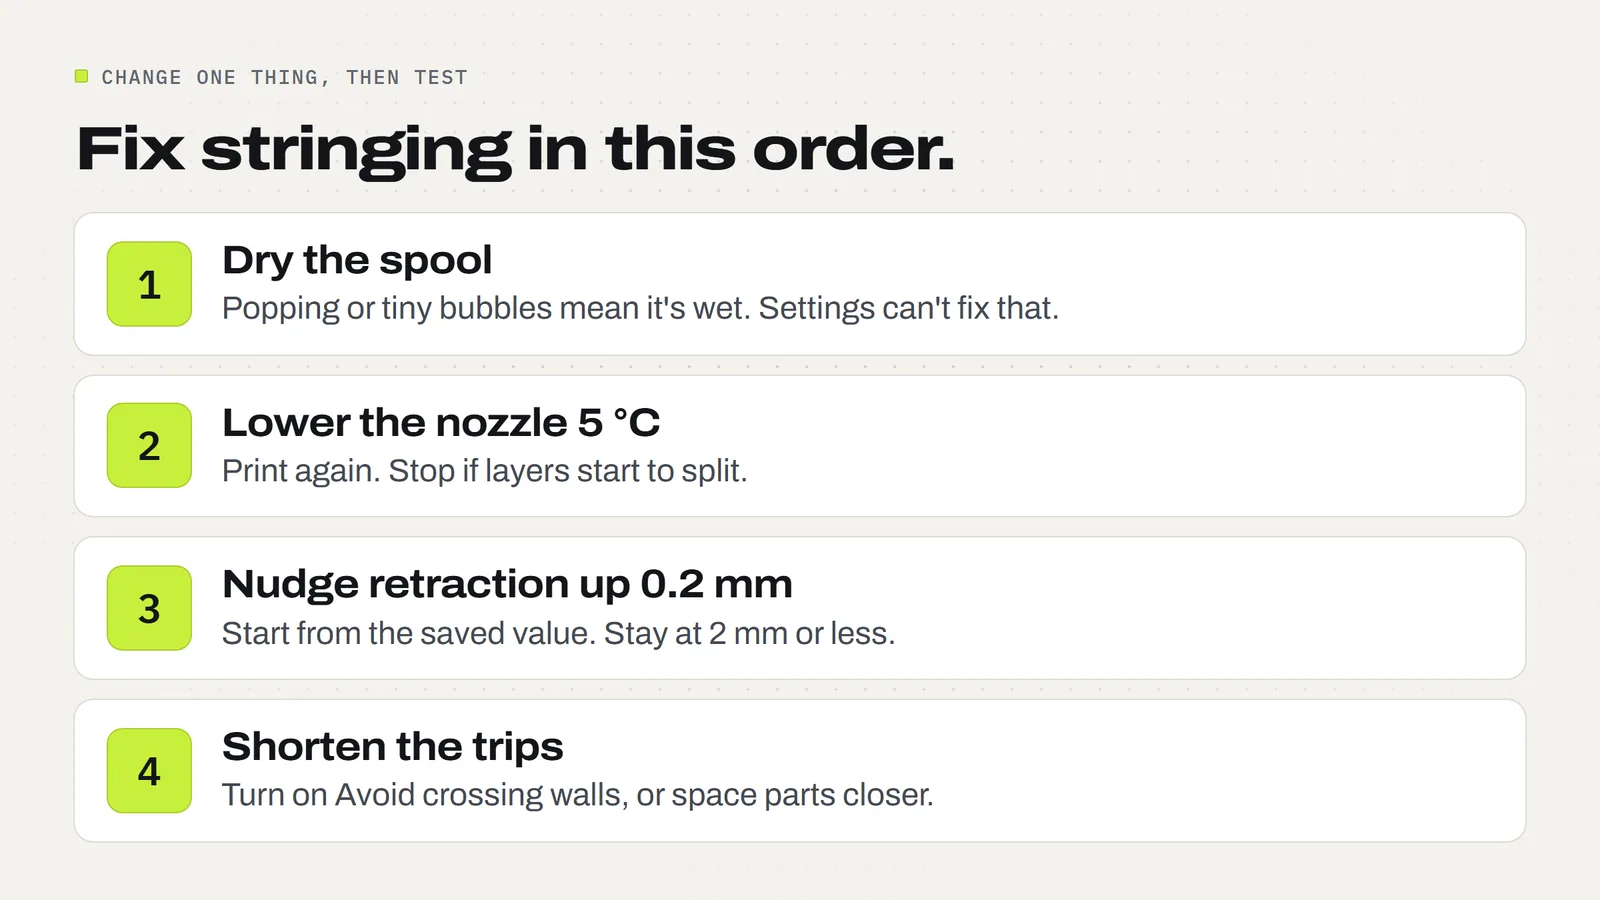
If a dry spool still strings, try these three in order. Change one thing, print the same small test, and compare. All three are changes to your copy of the project in Bambu Studio. If the app is new to you, start with Bambu Studio for beginners. Remember to slice again after each change.
Fix 2: Lower the nozzle temperature
Open the filament settings with the small edit icon beside the filament in the left panel, and lower the nozzle temperature by 5 °C. Try one more step if it helps. FilamentHub's PETG guide recommends the same 5 °C steps. Go back up if the layers begin to split or the print looks weak.
Stay inside your spool's printed range. Bambu's sheets list 190 to 230 °C for PLA Basic and 240 to 270 °C for PETG Basic. A lower temperature can also limit how fast the plastic can flow, so very fast or thick prints may need the original setting.
Fix 3: Add a small amount of retraction
Bambu printers have the motor right above the nozzle, so they use very short retraction compared with older tube-fed printers. Printara gives 0.4 to 1 mm as a typical range for Bambu's A1, P1S and X1C. In the filament settings, the override is on the Setting Overrides tab. Raise it by 0.2 mm at a time and don't go past about 2 mm, because too much can clog the nozzle or make the motor skip.
Bambu's wiki describes a retraction tower for third-party printers, a test print with a different retraction length in each section, where you keep the shortest length that comes out clean. It is the careful way to do this, but most people selling ornaments won't need it.
Fix 4: Shorten the trips
Fewer trips over open air means fewer chances to leak.
- Turn on "Avoid crossing walls." This keeps the nozzle over the print where it can, so any leak ends up inside the part. It can add some print time. You can find it with the search box in the print settings.
- Move parts closer together, or split a very busy plate in two. Every gap is a trip.
Leave the scale of a print-in-place design alone while you're adjusting the plate. The gaps inside are sized for it, and our print-in-place guide explains why.
What settings do 3MF Labs projects use?
A 3MF project stores its print settings, so we read the ones in our own catalog. Of the 106 designs live today, 105 include 3MF projects, and those downloads contain 417 project files with saved settings. They share almost the same starting point.
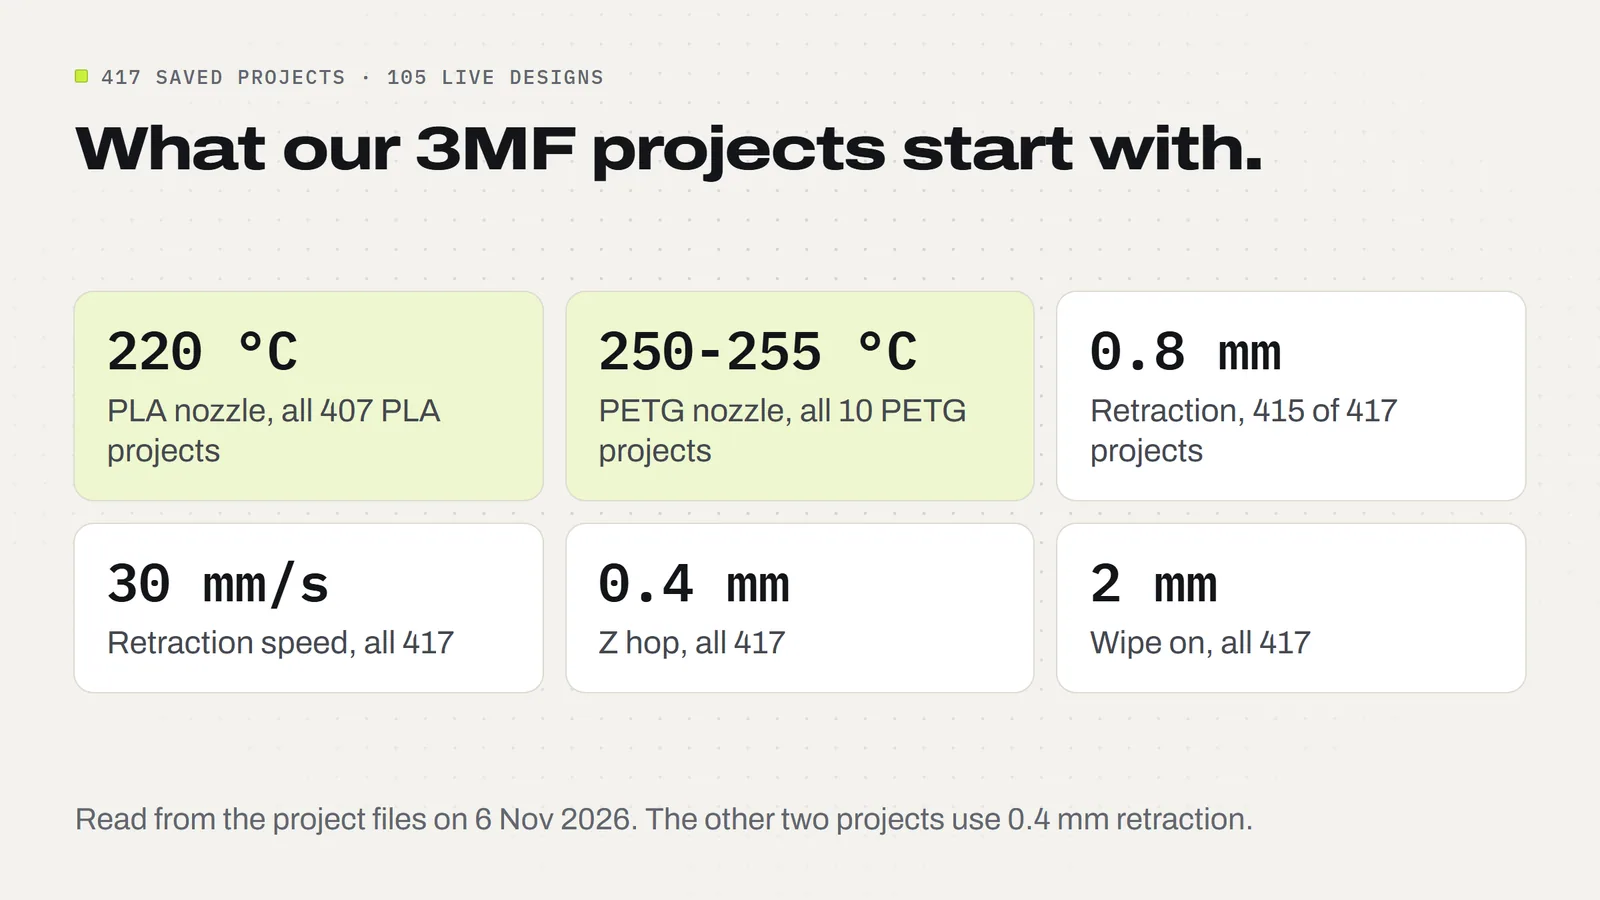
Two findings are useful here. First, all 407 PLA projects are saved at 220 °C and retraction is 0.8 mm in 415 of the 417 projects, so if you see strings on one of our designs, the settings to try changing are the same across the catalog. Second, "Avoid crossing walls" is off in all 417. That leaves it open as an easy thing to try on a plate of small parts, at the cost of some extra print time.
These numbers are a starting point, not a promise of string-free prints, and we didn't run a test on each change for this article. Your filament, your room and your printer all play a part.
How do you remove strings from a finished print?
Most come off by hand. Let the print cool first, because warm PLA and PETG bend easily, then work through it:
- Pull or rub off the loose hairs with your fingers.
- Use tweezers or small snips in tight spots, like the loops on earrings or the open top and doorway of the Castle Dice Tower.
- Be careful around moving parts. On an Articulated Cat, pick strings off without cutting into the joints. If the wheels on the Christmas Tree Truck bind, check for strings rather than forcing them.
- Use a heat gun only for a light touch-up. Keep it moving and give it a very short pass. PLA starts to soften at about 60 °C, so it doesn't take much to spoil the shape. Skip it entirely on thin or moving parts.
If you sell at a fair, build this into your time estimate, because even a minute per piece adds up across a batch. Our pricing guide covers what to charge. The 3MF Labs license lets you sell the physical prints you make, with no limit and no royalty.
How do you keep filament dry after drying it?
Drying only lasts as long as the storage does. Bambu's advice is to put the spool straight into a sealed container or an AMS with working desiccant (the little moisture-absorbing packets) as soon as it cools. A cheap hygrometer, a small humidity meter, tells you whether the box is doing its job.
Bambu's wiki says most filaments stay dry for a limited time only below 20% humidity, and even at 20% they generally last just 2 to 7 days before they need attention again. So during a long holiday print run, keep the spools you aren't using sealed up rather than lined up on a shelf.
For what the plastic and power cost per print, see how much it costs to 3D print. The FAQ covers common questions about our downloads, and the models page has every design if you're looking for something new to print.
Designs from this guide
 $5.99
3ML-040 · Marble run
Christmas Tree Marble Run
Drop a marble in by the star and watch it roll three and a half turns around the tree into a red present tray. STL + 3MF · 22 MB View model $3.79
3ML-039 · Spice rack
Modular Spice Rack
Three-step spice stands that slide together side by side, so you can print as many as your cupboard needs. Plus a pull-out tray for inside a cabinet. STL + 3MF · 54 KB View model $2.49
3ML-045 · Light clips
Christmas Light Clips
Four one-piece clips for hanging outdoor string lights on gutters, shingles and round porch rails, with no nails, screws or tools. STL + 3MF · 6.2 MB View model $3.79
3ML-105 · Earring collection
Ugly Sweater Earrings
Four pairs of ugly Christmas sweater earrings: a snowflake, a reindeer, a Christmas tree and a snowman. STL + 3MF · 6.4 MB View model $3.79
3ML-065 · Dice tower
Castle Dice Tower
A stone castle keep for game night: drop your dice in the top, they tumble down hidden ramps and roll out of the arched doorway into a walled courtyard. STL + 3MF · 375 KB View model $3.79
3ML-101 · Rolling truck
Christmas Tree Truck
A chunky red vintage pickup bringing home its Christmas tree. The black wheels click on and really roll, and the green tree leans back in the bed and lifts out, with no glue or tools. STL + 3MF · 7.4 MB View modelQuestions
What causes stringing in 3D printing?
Plastic leaking from the hot nozzle as it moves across empty space. Wet filament, a nozzle that is too hot, too little retraction and lots of long trips between parts all make it worse.
How do I know if my filament is wet?
Listen for popping or crackling at the nozzle, and look for tiny bubbles, holes or a rough surface on the print. A spool left out in a humid room is also a strong hint.
Does PLA need to be dried?
Bambu Lab lists drying as recommended for PLA Basic, not required. It is most worthwhile when a spool has been sitting out, or when you see strings, popping or a rough surface.
How long does it take to dry filament?
On Bambu's table, PLA Basic takes 8 hours at 50 °C in a forced-air oven and 12 hours at 45 °C in an AMS 2 Pro or AMS HT. PETG takes 8 hours at 60-65 °C in a forced-air oven and 12 hours at 65 °C in those AMS units.
Can you dry filament in the oven?
Not in a kitchen oven, says Bambu Lab: the heat is too uneven and can damage the spool or filament. It also rules out microwaves. Its oven numbers are for a forced-air convection oven.
Can I dry filament on an A1 or A1 mini bed?
No. Bambu's wiki says the P1P, A1, A1 mini and A2L are open-frame printers and can't be used to dry filament on the bed. Use a separate filament dryer instead.
Why does PETG string more than PLA?
PETG prints hotter and stays soft longer after leaving the nozzle, so it pulls thin threads more easily. Expect a few strings even with a dry spool, and clean them up by hand.
How do I remove strings from a 3D print?
Let the print cool, then pull off loose hairs by hand and use tweezers or small snips in tight spots. A very short pass with a moving heat gun can clear fine wisps, but skip it on thin or moving parts.
Sources
- Bambu Lab Wiki: Filament Drying Recommendations
- Bambu Lab: PLA Basic Technical Data Sheet V2.0 (hosted by Additive-X)
- Bambu Lab: PETG Basic Technical Data Sheet V2.0 (hosted by Additive-X)
- Bambu Lab Wiki: Calibration for 3rd Party Printer (retraction test)
- Bambu Lab Community Forum: How to avoid stringing during a 3D print
- Sovol: Why PETG stringing happens more often than PLA
- FilamentHub: Why does PETG string?
- Printara: 3D printing stringing causes and fixes
Filed under Printing and slicing