Gyroid Infill and Infill Patterns Explained: What to Pick for Things You Sell
Infill is the hidden lattice inside a 3D print, and it sets the weight, strength, time and cost. Here is what gyroid is, how it compares with other patterns, and how much infill each kind of item needs, from the settings in our 545 project files.
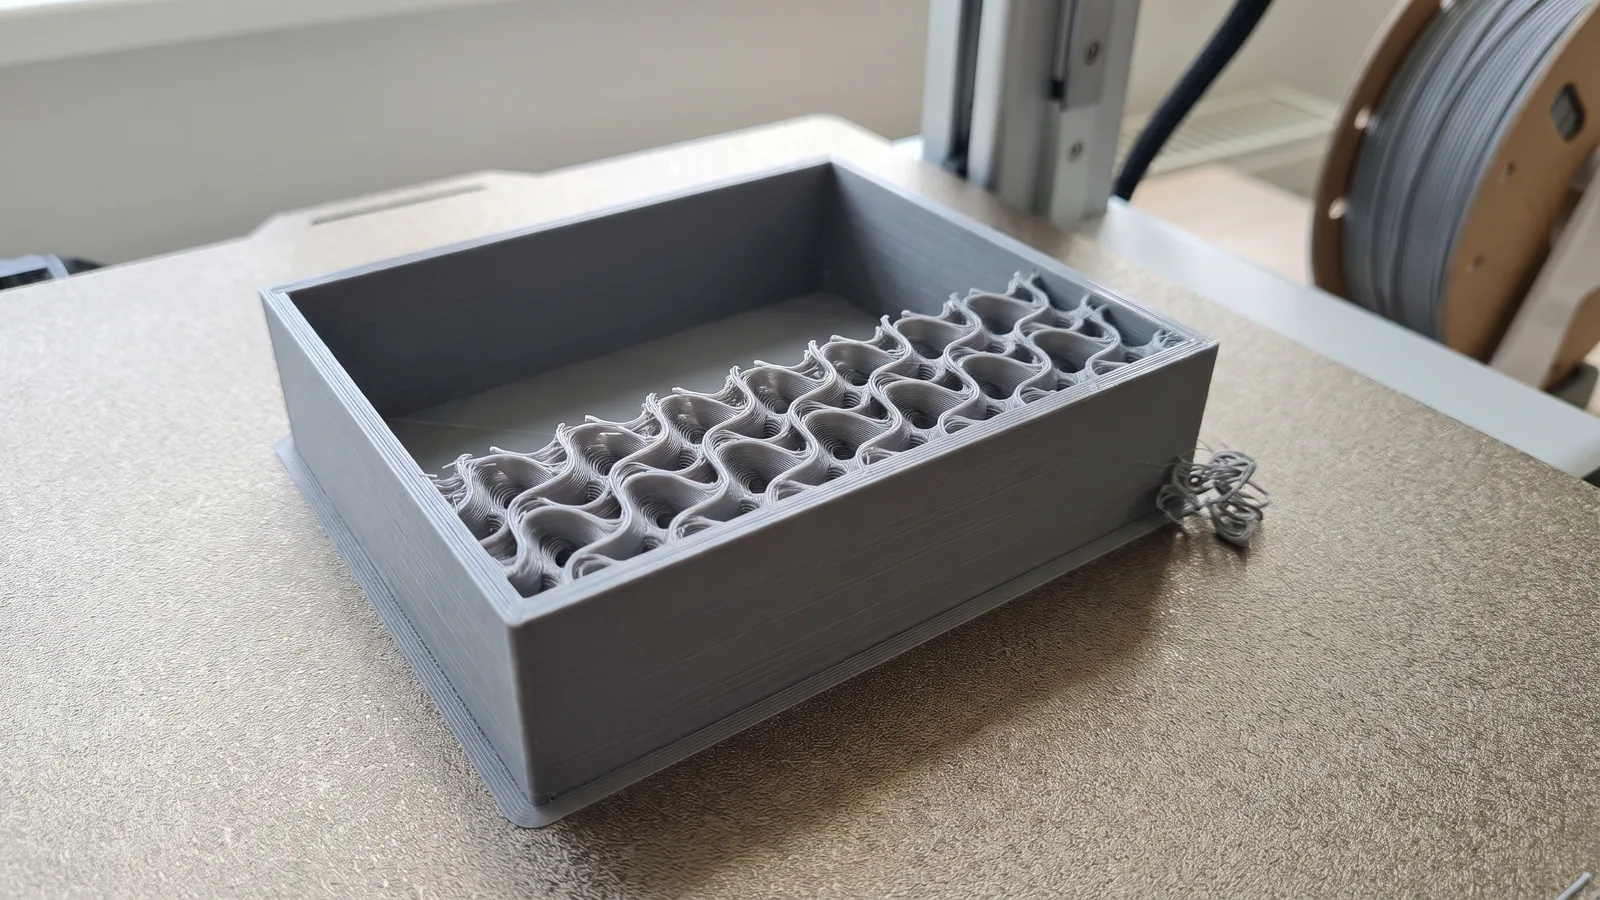
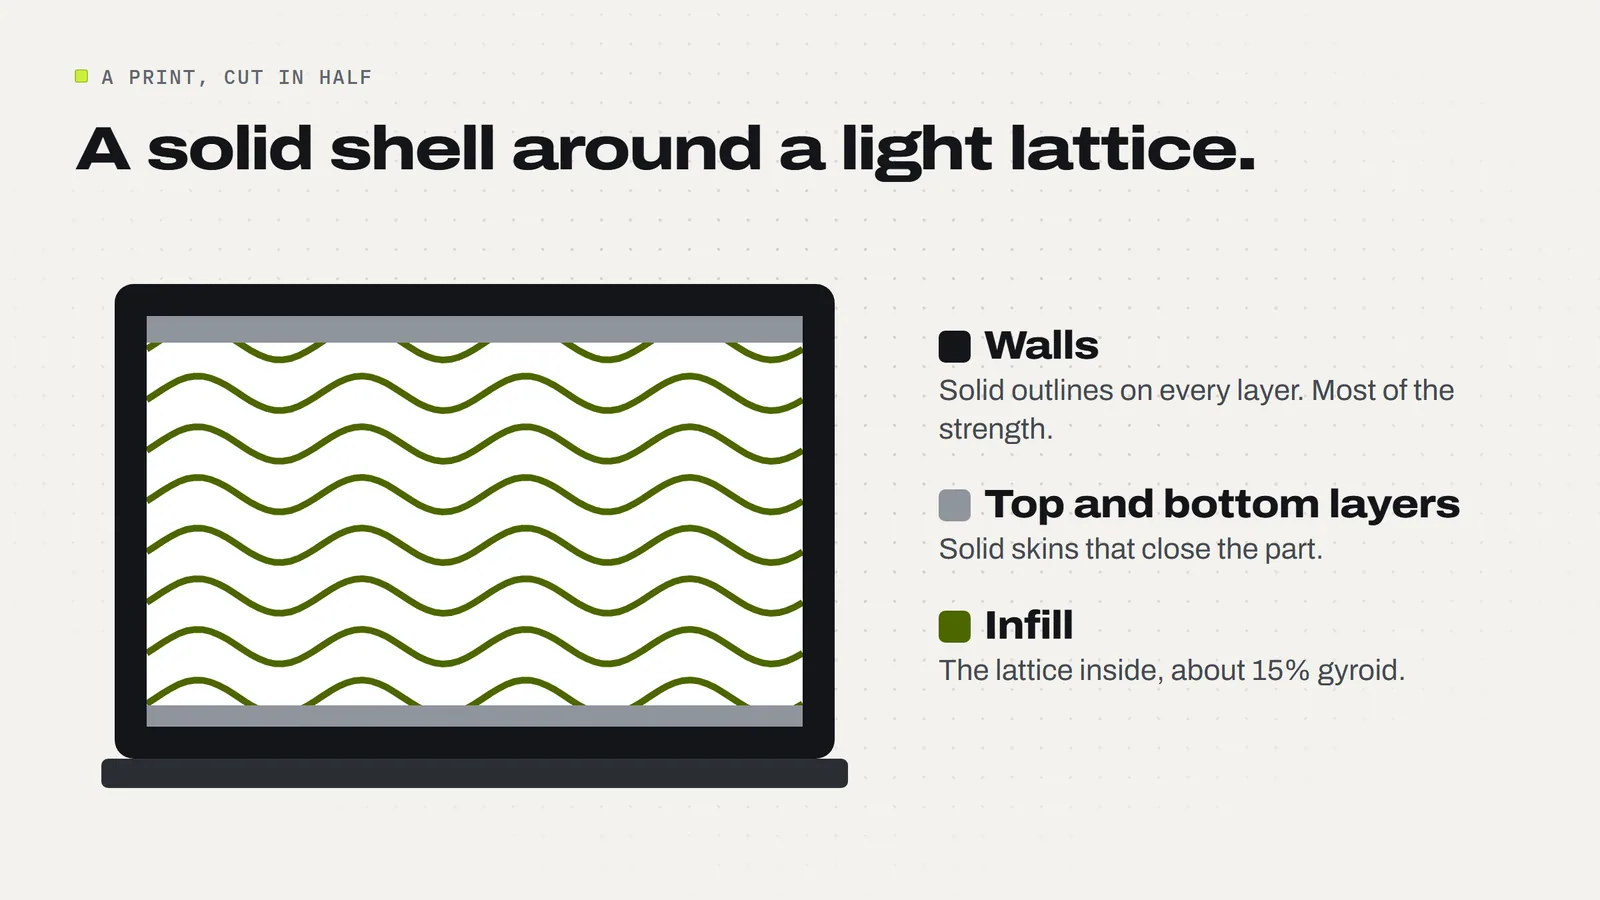
Cut a 3D print in half and it is mostly air. The outside is a thin shell of solid plastic, and the inside is a light honeycomb-like pattern called infill. That pattern, and how much of it there is, decides a lot: how much filament the print uses, how long it takes, how heavy it feels in a buyer's hand and whether it snaps when dropped.
This guide explains infill in plain terms, what the popular gyroid pattern is, how it compares with grid, lightning and the rest, and how much infill different kinds of items need. The numbers come from our own work: we read the saved settings in 545 project files behind our ready-to-print designs, and 453 of them use gyroid.
What is infill in 3D printing?
Infill is the structure a slicer (the app that turns a model into printer instructions) prints inside a part. A printer can't print a solid block quickly or cheaply, so it prints three things instead:
- Walls: the outlines around the edge of every layer. Most parts get two to four.
- Top and bottom layers: solid skins that close the part off, usually four or five layers each.
- Infill: a lattice that fills the space in between and holds the top layers up while they print.
Nobody sees the infill on a finished print. Its job is to give the part enough stiffness and enough support for the top surface, using as little plastic and time as possible.
What does infill percentage mean?
The infill percentage (Bambu Studio calls it sparse infill density) is how much of the inside is plastic. At 0% the part is a hollow shell. At 15% the lattice is fairly open. At 100% the inside is solid.
More infill means a heavier, stiffer part that takes longer and costs more. It is not a straight line, though: walls and top and bottom layers stay the same whatever the infill, so going from 15% to 30% does not double the filament used. Small items change little, because most of their plastic is in the shell anyway. Big, chunky items change a lot.
A useful rule: if you want a part to be stronger, add a wall before you add infill. The walls carry most of the load when a part is bent or squeezed, and an extra wall usually costs less than a big jump in infill.
What is gyroid infill?
Gyroid is an infill pattern made of smooth, wavy lines that shift a little on every layer. Stacked up, they form a continuous curved lattice that looks a bit like coral or a sponge. In math terms it is a "minimal surface" shape, but you don't need the math to use it.
Why so many people pick it:
- It is strong in every direction. The Bambu Lab wiki says its spiral shape gives excellent support in all dimensions, and Prusa's knowledge base calls it one of the few 3D structures that support well in every direction.
- Its lines never cross on the same layer. The nozzle doesn't bump over earlier lines, so it prints quietly and smoothly.
- It suits almost anything. That makes it a sensible "set and forget" choice for decor, gifts and toys.
It has a few small costs. Bambu's wiki notes that slicing takes longer and the printer file is bigger because the path is more complex, and that at high densities and high speeds it can shake the printer more. For a 15% fill on a craft item, none of that is a problem.
Gyroid vs grid and other infill patterns
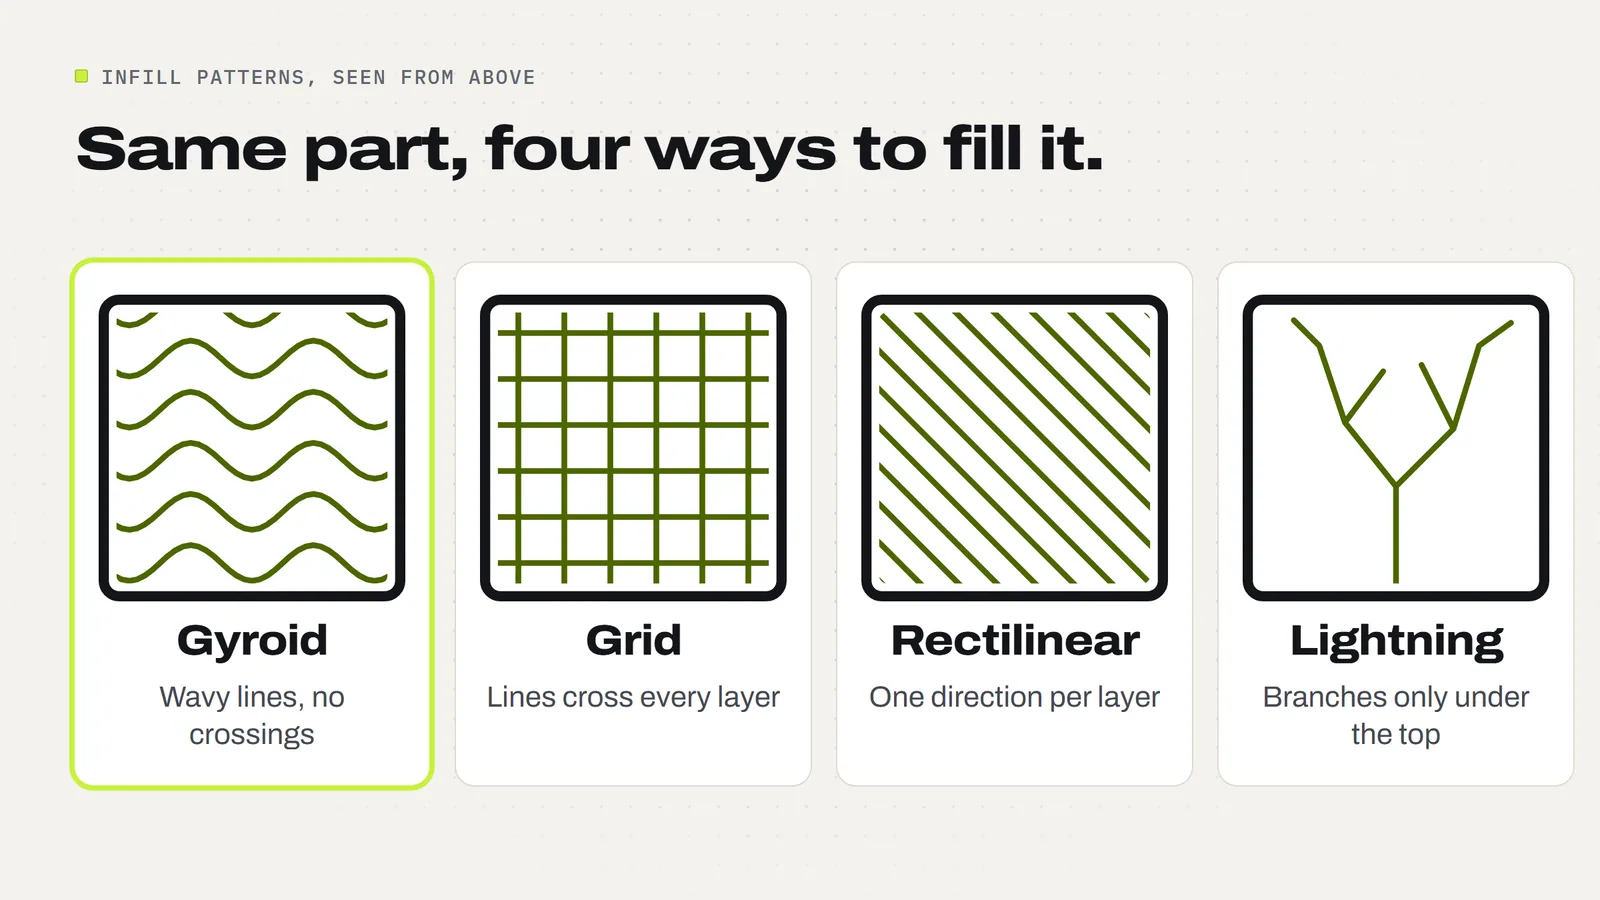
Bambu Studio offers about twenty patterns. You only need to know a handful. Here is how the common ones compare, using what the Bambu Lab and Prusa guides say about each.
| Pattern | What it is | Good for | Watch out for |
|---|---|---|---|
| Gyroid | Wavy curved lattice, no crossing lines | Almost everything: decor, gifts, toys | Slower to slice; can shake the printer at high fill and speed |
| Grid | Two sets of straight lines crossing on each layer | Quick everyday parts | Plastic builds up at crossings; the nozzle can scrape and rattle |
| Rectilinear | Straight lines, one direction per layer, turning 90° each layer | Fast, light parts; solid 100% fills | Lower strength at low fill |
| Cubic / adaptive cubic | Tilted cubes; adaptive gets sparser in the middle | Large items where you want to save filament | Not much, it's a fine all-rounder |
| Honeycomb | Hexagon cells | Stiff, impact-resistant parts | About 25% more material, per Bambu; slower |
| Lightning | Branches that only hold up the top surface | Display-only pieces that are never handled hard | Almost no strength inside |
On a fast printer, the gyroid vs grid question mostly comes down to noise and reliability. Grid is simple and fast, but the Bambu wiki notes its crossings can cause the nozzle to scrape the print at high speed. Gyroid avoids that, which is a big part of why we use it.
What infill do our project files use?
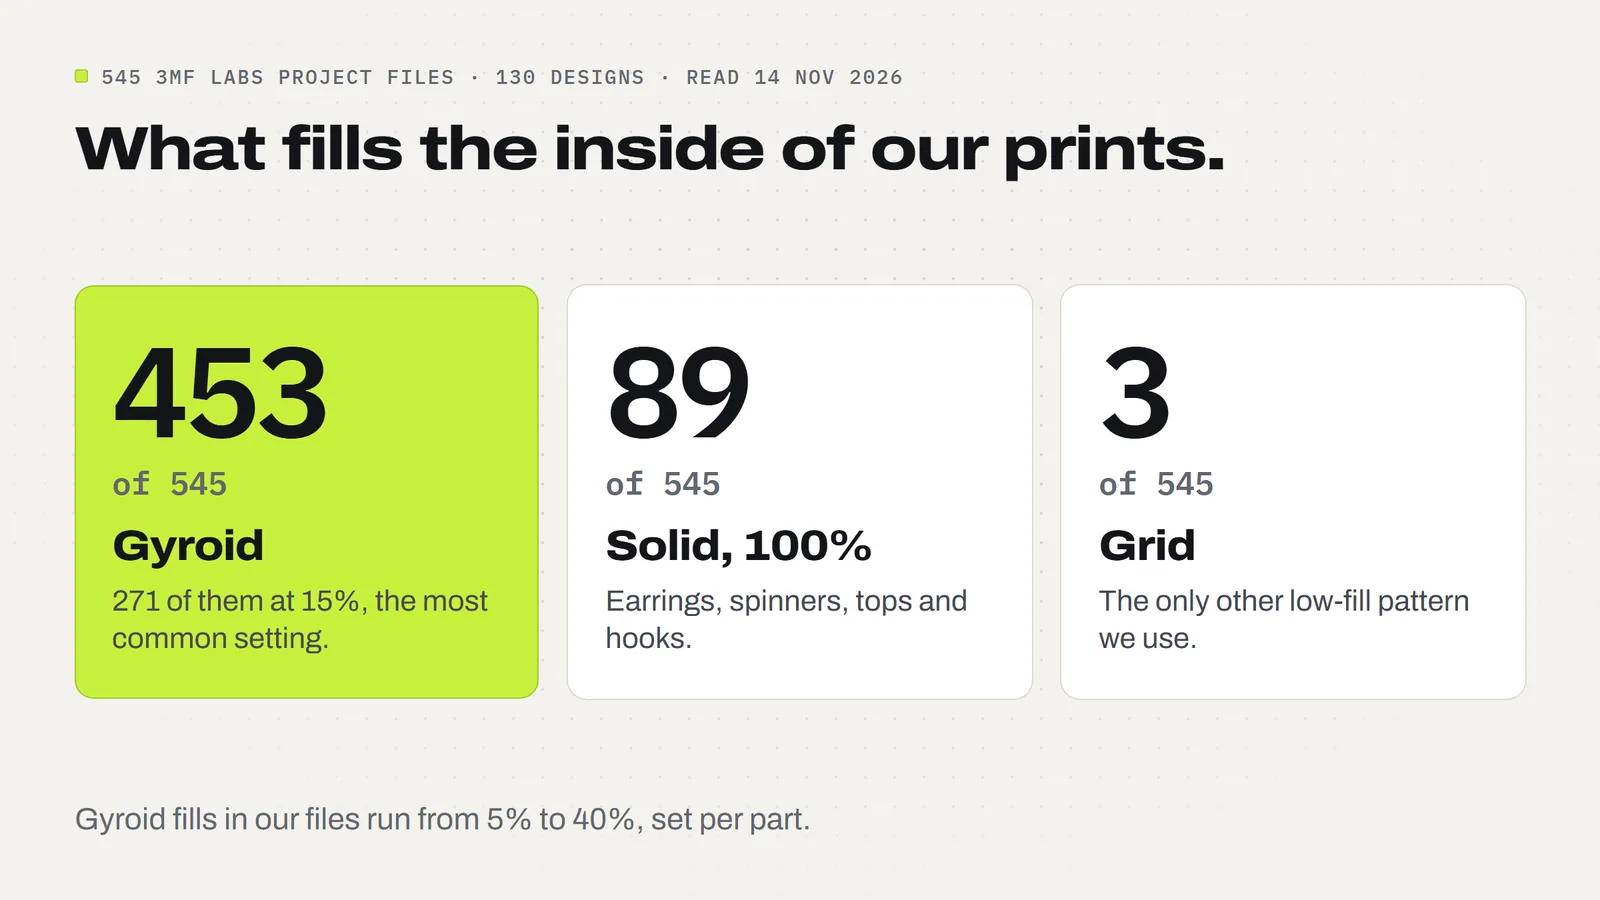
We read the saved settings in all 545 of our 3MF project files (the print-ready files with the plate, colors and settings already set up) across 130 designs. Here is what we found on 14 November 2026:
- 453 of 545 use gyroid. That is 83% of our files.
- 271 of those are gyroid at 15%, the most common setting by far.
- 89 are printed solid (100%). Most are earrings, spinning tops, fidget spinners and the stocking holder hooks: thin parts, parts that move, or parts that carry weight.
- Gyroid fills range from 5% to 40%, depending on what the item has to do.
- Only 3 files use a different low-fill pattern, all grid.
How much infill do you need?
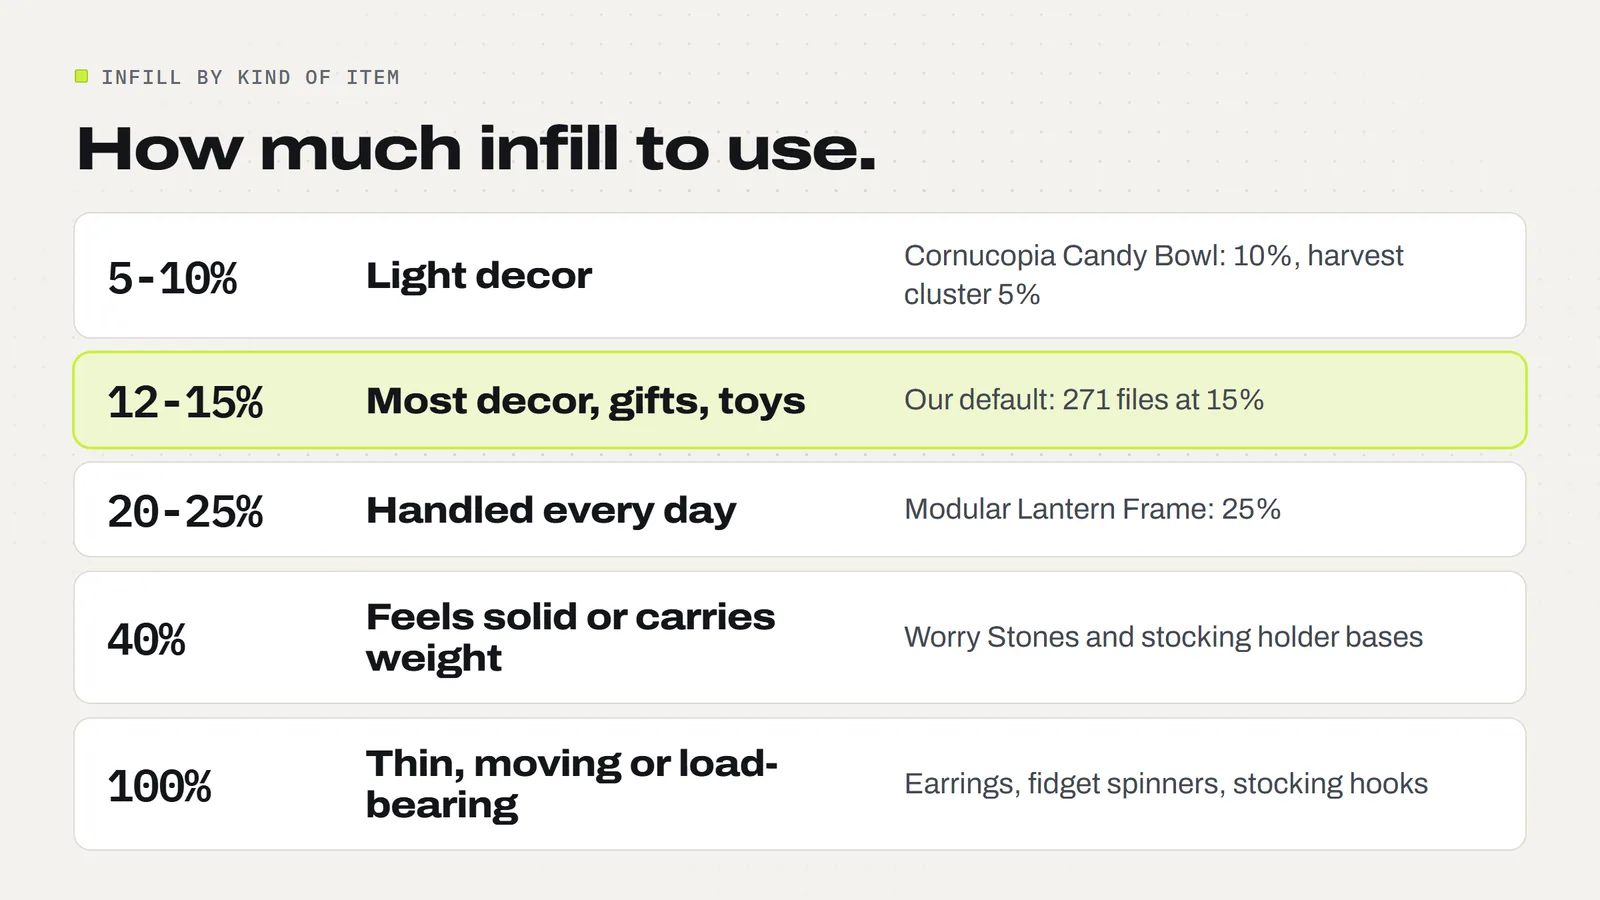
Match the fill to what the item has to do. These ranges are the ones we actually use, with a real design for each:
- 5 to 10%: light decor that just has to hold its shape. The Cornucopia Candy Bowl prints at 10%, and its harvest cluster at 5%. Shells carry these.
- 12 to 15%: most decor, gifts and toys. This is our default and the right starting point for most things you sell.
- 20 to 25%: parts that get handled or hold things together. The Modular Lantern Frame prints at 25%, because it is picked up by the handle and has panels slid in and out all season.
- 40%: things that should feel solid in the hand, or carry weight. Our Worry Stones print at 40% so they feel weighty, and still slice to 42 minutes and 8.98 g of PLA per stone. The Christmas Stocking Holder bases also print at 40%.
- 100%: thin parts, moving parts and load-bearing hooks. Earrings like the Thanksgiving Earrings are so thin the inside would be solid anyway. Fidget spinners print solid so the spinning parts stay firm. The stocking holder hooks print at 100% because they carry the stocking.
Notice that a single design can use more than one fill. The stocking holders use 40% for the base, 25% for the lid and 100% for the hook. That is normal: each part gets the fill its job needs.
When should you use lightning infill?
Lightning infill is the fastest, lightest option. Instead of filling the whole inside, it grows thin branches only where they are needed to hold up the top surface. Bambu's wiki describes it as made for decorative models that don't need to bear any load.
That makes it handy for a big display piece you want to print quickly, or a test print to check size and color. It is a poor choice for anything a buyer will squeeze, drop or hang. For items you sell, we would stick with gyroid at a low fill: it costs a little more filament and gives a part that survives being handled at a market table.
How do you change infill in Bambu Studio?
If you open one of our 3MF projects, the infill is already set, so you don't need to touch it. If you are setting up your own file, or want to experiment:
- Open the file and look at the process settings on the left.
- Open the Strength tab.
- Set Sparse infill density (the percentage) and Sparse infill pattern (for example, Gyroid).
- Slice the plate and check the new time and grams at the bottom before you print.
Settings changed there apply to the whole plate. To give one part its own fill, like the hook in the stocking holders, select that part in the object list and switch the settings panel from Global to Objects. Our project files already carry these per-part settings, which is one reason a ready-made 3MF file is easier than a bare STL. New to the app? Start with Bambu Studio for beginners.
Does more infill make a print stronger?
Yes, but less than you'd think, and with diminishing returns. A part breaks from the outside in, so the walls take most of the force. Going from 15% to 40% infill makes a part stiffer and heavier, but adding one or two walls often helps more for less plastic. For really demanding parts, the material matters too: see PLA vs PETG.
Infill also affects cost. Since a sliced plate's grams set your filament cost, a sensible fill keeps your price competitive. Our guide to what it costs to 3D print something shows how grams turn into dollars.
A quick infill checklist for things you sell
- Start at gyroid 15% for decor, gifts and toys.
- Go down to 5 to 10% for big, light decor where the shell does the work.
- Go up to 25 to 40% for parts that get handled hard or should feel heavy.
- Print thin, moving and load-bearing parts solid.
- Need more strength? Add a wall first, then more infill.
- Use lightning only for display pieces nobody will squeeze.
- Always re-slice and check grams and time after you change anything.
Or skip the guesswork: every design in our model library comes as a 3MF project with the infill, walls and colors already set for each part, plus the STL files for any other slicer and a license that lets you sell the prints you make.
Designs from this guide
 $2.49
3ML-052 · Worry stone
Worry Stones
Six pocket worry stones with a smooth, deep thumb dip: a classic oval, a rippled oval, a heart, a leaf, a paw and a turtle. STL + 3MF · 8.4 MB View model $5.99
3ML-016 · Mantel decor
Christmas Stocking Holders
Four weighted stocking holders for the mantel: a nutcracker soldier, a snowman, a Christmas tree and a gingerbread house. STL + 3MF · 9.2 MB View model $2.49
3ML-012 · Lantern frame
Modular Lantern Frame
The Modular Lantern's frame, roof and carry handle. Print it once, then slide in a set of panels for every season. STL + 3MF · 2.0 MB View model $3.79
3ML-017 · Candy bowl
Cornucopia Candy Bowl
A woven-look cornucopia horn that holds wrapped candy, with a curled tail and a harvest cluster that hooks over the rim. STL + 3MF · 12 MB View model $3.79
3ML-015 · Earring collection
Thanksgiving Earrings
Four pairs of Thanksgiving earrings: turkeys, pumpkin pie slices, maple leaves and acorns. STL + 3MF · 5.0 MB View model $2.49
3ML-071 · Fidget spinner
Turkey Fidget Spinner
Eight tail feathers spin around a turkey-face hub. It prints in place in one piece: no metal bearing, no assembly. STL + 3MF · 5.6 MB View modelQuestions
What is gyroid infill?
Gyroid is an infill pattern of smooth, wavy lines that shift slightly on every layer, forming a curved lattice inside the part. It gives good support in every direction, and its lines never cross on the same layer, so the nozzle doesn't bump over earlier lines.
Is gyroid infill better than grid?
For most prints, yes. Both are fine for everyday parts, but grid lines cross on every layer, which builds up plastic and can make the nozzle scrape at high speed. Gyroid avoids that and is strong in every direction. 453 of our 545 project files use gyroid; 3 use grid.
What is the best infill percentage?
There isn't one number for everything. Start at 15% for decor, gifts and toys. Use 5 to 10% for big, light decor, 20 to 40% for parts that are handled hard or should feel heavy, and 100% for thin, moving or load-bearing parts. 271 of our files use 15% gyroid.
Does more infill make a 3D print stronger?
Yes, but with diminishing returns. The walls carry most of the force when a part is bent or squeezed, so adding a wall often helps more than a big jump in infill, and uses less plastic. More infill mainly makes a part stiffer and heavier.
What is lightning infill used for?
Lightning infill grows thin branches only where they are needed to hold up the top surface, so it is the fastest and lightest option. It suits display pieces and test prints that nobody will squeeze, drop or hang, not parts that have to take any load.
What is the difference between infill and walls?
Walls are the solid outlines around the edge of each layer, and they form the outside of the part. Infill is the open lattice inside. Walls carry most of the strength and set how the surface looks; infill holds the shape and supports the top layers.
How do I change the infill in Bambu Studio?
In the process settings, open the Strength tab and set Sparse infill density and Sparse infill pattern, then slice and check the time and grams. To change one part only, select it in the object list and switch the settings from Global to Objects.
Does infill change how a print looks?
Usually not, because the walls and top layers hide it. Too little infill can show as sagging or small holes on a flat top surface. If that happens, add a top layer or a little more infill. On see-through filament, the pattern can show through the walls.
Sources
Filed under Printing and slicing