How to Paint Colors in Bambu Studio (and When a Filament Swap Is Easier)
Painting a model in Bambu Studio takes minutes. Printing what you painted can take all night. Here's how the tool works, and how to tell when a single spool swap gets you the same result.
Bambu Studio has a tool that lets you color a 3D model the way you'd color a page: pick a filament, click, and the surface changes. It's fun and it's easy to overdo. A few careless strokes can turn a two-hour print into an overnight one, and sometimes one spool swap would have given you the same look.
So this guide does two things. It walks through painting step by step, in plain language. Then it helps you decide when painting is the right call and when a filament swap or separate parts will do the job for less. If you just want something ready to print, every design on our models page already has its colors set up, so you can skip the painting altogether.
New to the program? Start with Bambu Studio for beginners, which covers opening, slicing and sending a print. If you're not sure what a project file holds, what a 3MF file is explains why colors can be saved in one at all.
What does the color painting tool actually do?
Your model's surface is made of thousands of tiny triangles, called the mesh. Painting marks those triangles with a filament number. When you slice, Bambu Studio turns each marked area into print paths for that filament. In Bambu's words, the painted model is sliced into tool paths "extruded by multiple filaments."
Two things follow from that:
- Painting doesn't change the shape. No part of the model gets thicker or thinner. Only the filament used in each area changes.
- Painted colors are real filament, not a coating. The printer has to switch spools to lay them down, and every switch costs time and plastic. We'll come back to that, because it's the part most tutorials leave out.
How do you paint colors in Bambu Studio?
Here's the whole job, using the steps and shortcuts from Bambu's wiki:
- Add your colors first. In the Filament list on the left, click the plus button once for each color you want, then click each row to set its type and color. The painting tool only offers filaments already in the project, so this comes first.
- Select the model and open the tool. Click the model on the plate, then click the Color Painting icon in the top toolbar, or press
N. - Pick a color. Click a color box in the tool's panel, or press
1to9for the matching filament. - Pick a tool and paint. Start with Fill or Height range for big areas, then use Circle for details. There's more on each tool below.
- Fix your mistakes. Hold
Shiftand drag with the left mouse button to erase.Ctrlplus the mouse wheel changes the pen size.Altplus the wheel cuts away the view so you can reach hidden surfaces. - Clean up with Gap fill. It finds the little unpainted specks you missed and fills them from a neighboring color.
- Close the tool, slice and check. Click Slice plate, then look at the Preview tab. If you see line types instead of your colors, change the color scheme menu to Filament. Note the print time and grams before you send it.
That last step matters most. Bambu Studio will happily slice whatever you paint, and the preview is the first place you'll see what it's going to cost.
Which painting tool should you use?
The tool has six brushes. You'll use two of them most of the time.
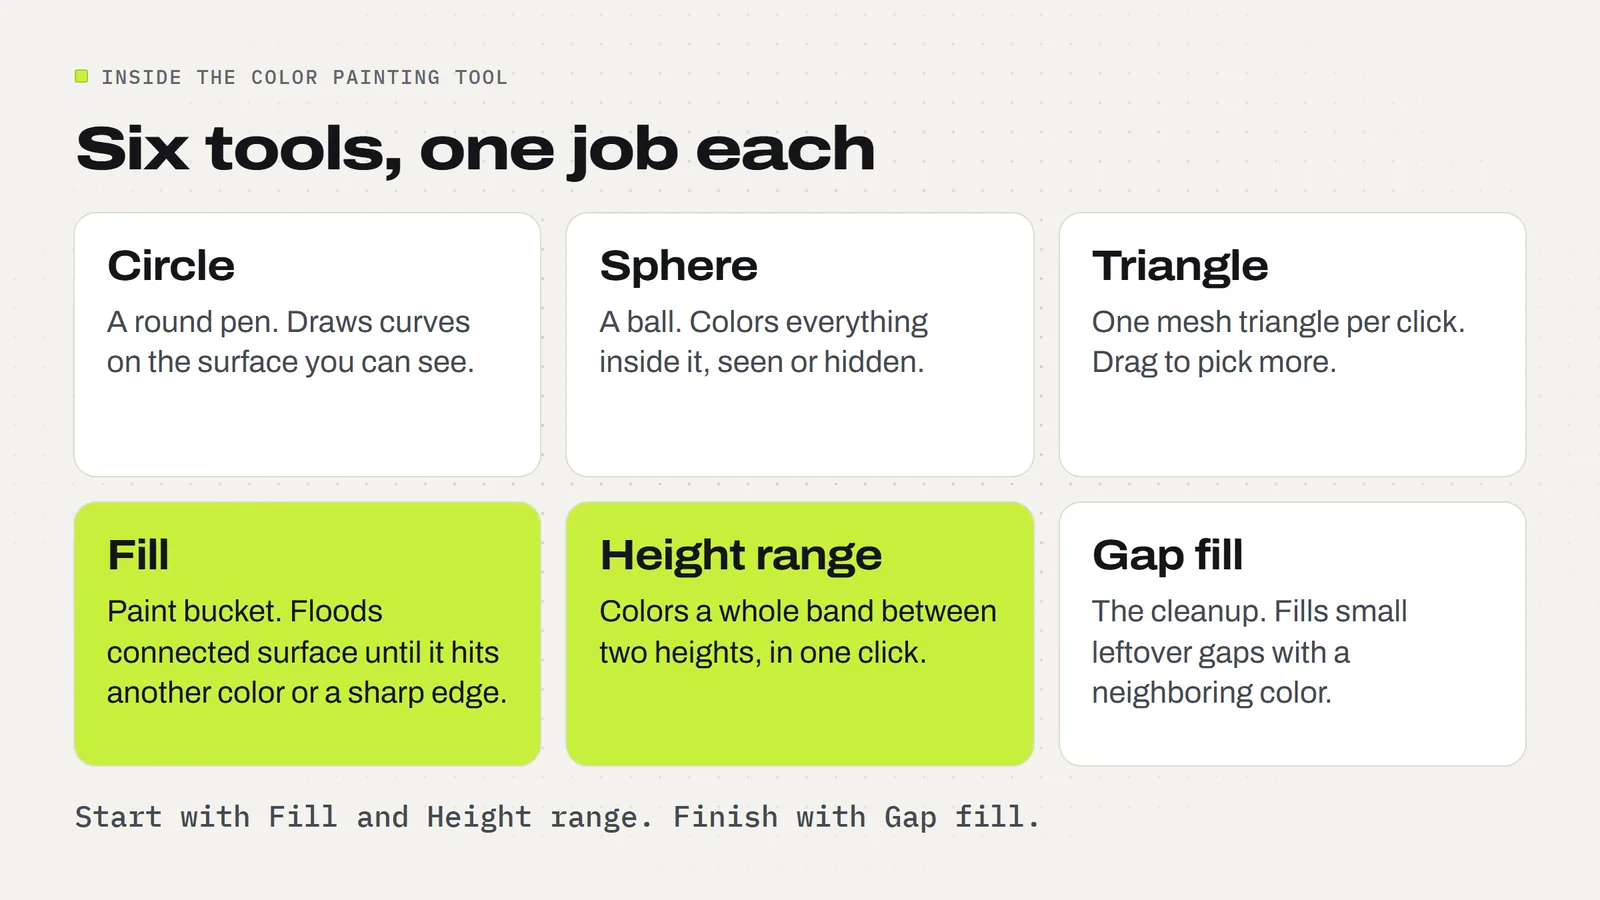
- Fill works like a paint bucket. Click a surface and the color spreads across connected triangles until it hits a different color. Turn on Edge detection and it also stops at corners sharper than the angle you set. If it floods too far, lower that angle.
- Height range colors everything between two heights, even separate areas, with one click. It's made for stripes, bands and a colored top or base. You can click on the model to choose the height or type a number into the box.
- Circle is the normal pen, for eyes, buttons and curves. It only colors the surface facing you.
- Sphere colors everything inside a ball, including surfaces you can't see from where you're looking. Handy for wrapping around a small shape, and easy to overdo.
- Triangle colors one mesh triangle per click. Use it for tidy touch-ups on simple models.
- Gap fill is cleanup. Bambu's wiki points out that painting often leaves gaps that "may look ugly and increase (expensive) filament changes," which is a good reason to run it before every slice.
A tip on detail: the printer draws with a nozzle, usually 0.4 mm wide, so a painted line much thinner than that won't come out cleanly. Paint bold shapes and zoom in to check the edges. On a simple model with big triangles, edges can look jagged, because the color has less mesh to follow.
Why does painting make a print take so much longer?
Each time the printer changes color on a single-nozzle machine, some of the old color is still inside. New filament has to push it out before the color runs clean. Bambu calls this flushing, and its wiki is frank that too much of it wastes both filament and print time. Colors that sit side by side in the same layer force a change on every layer.
Our own Chattering Nutcracker keychain shows the scale, and it isn't even painted: its colors are separate parts, but the printer does the same spool changing either way.
| Design | One color | Full color | What changed |
|---|---|---|---|
| Chattering Nutcracker | 1 h 40 min, 24 g | 10 h 11 min, 110 g | 288 filament changes on a small keychain |
| Santa Sleigh Candy Dish | 8 h 01 min, 143 g | 13 h 23 min, 202 g | Three colors on a bigger print: about 67% more time |
So before you add one more little painted detail, ask if you can see it from arm's length. A tiny dot of color high on a tall model can mean a stop at every layer it touches. The times come from Bambu Studio's estimates on our project files, and your own will vary with your printer and settings. Our guide to the AMS breaks these numbers down further.
When is a filament swap easier than painting?
Whenever your colors sit in stacked bands rather than side by side. If the bottom of the model is one color and everything above a certain height is another, you don't need to paint at all, and you don't need an AMS (Bambu's automatic spool changer). You add one pause, swap the spool by hand when the printer stops, and it carries on.
To add one, slice the model, drag the layer slider in the preview to the first layer of the new color, right-click the slider and add a pause. Bambu's forum has reports of both Pause and Change Filament working differently across printers and versions, so run a small test first if you haven't done it on your machine.
Here's how to choose:
| Your model | Best way to color it | Needs an AMS? |
|---|---|---|
| One color top to bottom | Nothing to do | No |
| Stacked bands, like a colored rim or a raised black design on a backing | A pause and a spool swap | No |
| Shapes already modeled as separate pieces | Set a filament per part | Yes, if the colors share a layer |
| A single solid shape needing eyes, stripes or buttons | Paint it | Yes, if the colors share a layer |
| Any of these, on a deadline for a craft fair | One color, in a filament that looks good | No |
Real examples from our own projects: the Cornucopia Candy Bowl has a saved pause at 9.2 mm to swap coffee brown for caramel. The Game Controller Stand gets its teal stripe with one saved pause at 83.2 mm. The Harvest Lantern Panels switch to black after the third layer, at 0.60 mm, so one filament change covers a whole plate of decorative plates. None of those needs a brush. The ornament guide shows the same approach on flat designs.
Do designers use painting? What we found in our own files
We got curious and checked. We scanned every 3MF project in the 98 live designs that ship one, looking at how the colors are stored.
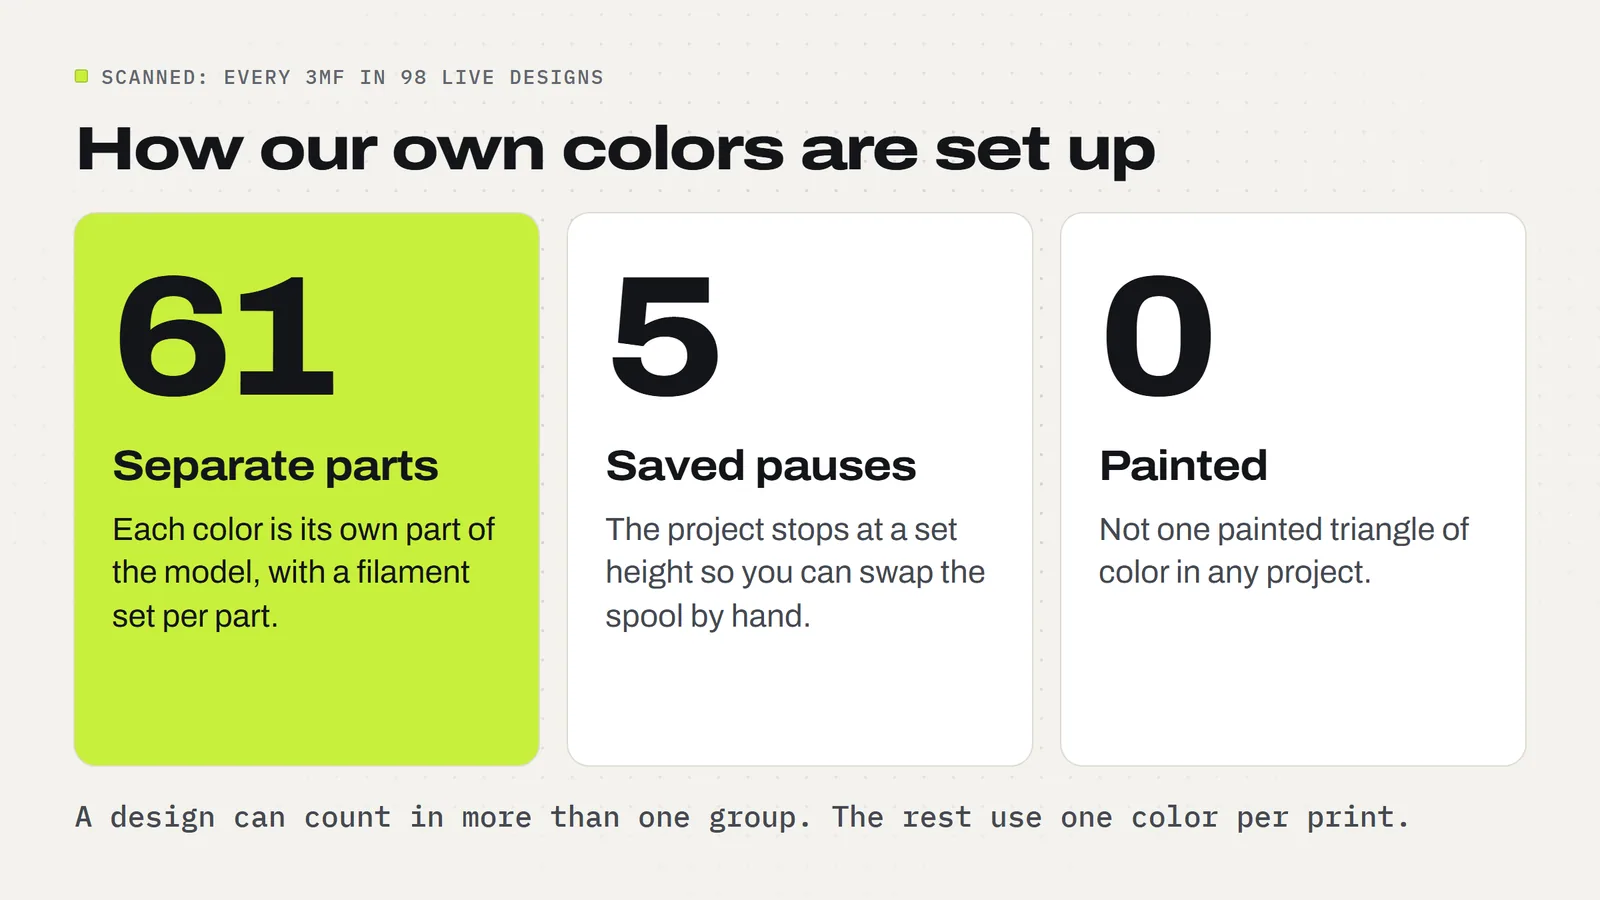
Not one uses painted color. 61 designs set their colors up as separate parts, and 5 have a saved pause for a spool swap. The rest use one color per print.
That isn't a knock on the tool. It's what you'd expect when you're designing a model from scratch: if you can model each color as its own part, the color's edge follows the exact shape you drew, and it's easy to change later. Painting earns its place the other way around, when someone hands you a finished one-piece shape and you want color on it. An STL from a friend, an old file, a scan: that's the job for a brush.
There's a middle option worth trying first. If your STL contains separate shells, the wiki's Split to Parts command, in the top toolbar, breaks them into parts that stay in position. Then you can give each part its own filament from the object list, or select it and press 1 to 9. For a model that's already in pieces, that takes a minute and gives clean edges with no painting at all.
Should you repaint a file you bought?
Usually you don't have to. Our 3MF downloads open with the colors already assigned. To change them, click each row in the Filament list and pick the color you own, which recolors everything using that row in one move. Turning a red snake's swirls green takes seconds and no brush.
The STLs in each download are the shapes without colors, for one-color printing or your own setup. Our Peppermint Snake shows why it's worth keeping the project: its red swirls start at layer 4 and sit beside the white in every layer after that, and the project has all that ready. If you do want to paint an STL instead, one tip applies to every print-in-place design: paint freely, but don't scale it, because that closes the joint gaps. Our print-in-place guide explains why.
Not sure which file to open? STL vs 3MF covers it, and the conversion guide shows what stays behind when you move between them.
Can you sell prints you color yourself?
Yes. The 3MF Labs license lets you sell the physical prints you make from our designs, with no limit and no royalty, in whatever colors you choose. It doesn't let you share or resell the files, and that includes changed versions, so a repainted project stays on your own computer.
If you're printing to sell, count the extra time and filament in your price. Our pricing guide has the formula, and the FAQ covers the common setup questions. When you'd rather spend the evening printing than painting, browse the designs: the colors are already done.
Designs from this guide
 $3.79
3ML-013 · Flexi snake
Peppermint Snake
A wiggly snake made of peppermint candies, with black eyes and a red tongue. It prints in one piece, already joined, so there's nothing to put together. STL + 3MF · 23 MB View model $3.79
3ML-026 · Fidget keychain
Chattering Nutcracker
A nutcracker soldier keychain whose chin swings open and clacks shut: tall black hat with a red plume, curled white hair, a big black mustache and a little white beard. STL + 3MF · 12 MB View model $3.79
3ML-017 · Candy bowl
Cornucopia Candy Bowl
A woven-look cornucopia horn that holds wrapped candy, with a curled tail and a harvest cluster that hooks over the rim. STL + 3MF · 12 MB View model $2.49
3ML-090 · Controller stand
Game Controller Stand
A one-piece desk stand that shows off a game controller standing upright, grips resting in two rounded saddles and its back on a leaning backrest with a teal stripe. STL + 3MF · 5.5 MB View model $3.79
3ML-014 · Lantern panels
Harvest Lantern Panels
Four light-up Thanksgiving scenes for our Modular Lantern: a pumpkin patch under the harvest moon, a turkey, falling leaves and acorns. STL + 3MF · 3.7 MB View model $2.49
3ML-012 · Lantern frame
Modular Lantern Frame
The Modular Lantern's frame, roof and carry handle. Print it once, then slide in a set of panels for every season. STL + 3MF · 2.0 MB View modelQuestions
Where is the color painting tool in Bambu Studio?
It's in the top toolbar on the Prepare page. Select the model on the plate, then click the Color Painting icon or press N. The panel lists your project's filaments as color boxes, so add your colors to the Filament list first.
How do I erase painting in Bambu Studio?
With any painting tool except Gap fill selected, hold Shift and drag with the left mouse button. Bambu's wiki lists it as the erase shortcut. Ctrl plus the mouse wheel changes the pen size.
Do I need an AMS to paint in Bambu Studio?
You don't need one to paint, but you do need one to print painted colors that share a layer, because the printer has to switch filament on every layer. If your colors sit in stacked bands, add a pause and swap the spool by hand instead.
How do I change filament color at a certain height?
Slice the model, drag the layer slider in the preview to the first layer of the new color, right-click and add a pause. When the printer stops, swap the spool and resume. With an AMS, the Height range painting tool does the same job with no stop.
Why did painting make my print take so much longer?
Each color change has to flush the old color out of the nozzle, which costs time and filament. Our Chattering Nutcracker keychain goes from 1 h 40 min and 24 g in one color to 10 h 11 min and 110 g in full color, with 288 changes.
How do I paint inside or hidden areas of a model?
Use the section view: Alt plus the mouse wheel cuts away the model so you can reach surfaces blocked from view. The Sphere tool also colors everything inside its ball, including surfaces you can't see.
Can I change the colors in a 3MF without painting?
Yes. Open it as a project and change the color of each row in the Filament list. Everything assigned to that row changes with it. You only need the paint tool if you want color somewhere the design doesn't already have it.
Can I sell prints I painted from a 3MF Labs design?
Yes. The license lets you sell the physical prints you make in any colors, with no limit and no royalty. You can't share or resell the files, including changed versions of them.
Sources
Filed under Printing and slicing